Maintaining an Effective Designer/Developer Workflow

With Adobe Flash Catalyst CS5
One of the biggest pain points in many agencies is the workflow between designer and developer. Between handoff and implementation a Web design can easily be compromised or the developer might spend endless hours attempting to maintain the integrity of the initial design. Neither is an ideal situation. On one end, critical design elements might be lost and, on the other end time and resources can be wasted.
Instead, with a consistent workflow a good design does not have to suffer nor does a developer need to waste time or sacrifice usability on behalf of the design aesthetic. One tool in particular can help establish a workflow that results in a rich Internet application for the Web, desktop and even mobile devices. It's called Adobe Flash Catalyst CS5.
Let's take a close look at how to use this powerful system.
The Project
The example project we will build is a rich Internet application (RIA) for the tourism board for Tanzania. To start, we will design the application with flight, lodging and excursion information, as well as customer video testimonials, interactive maps and access to Twitter feeds.
The Design
The first step for the designer is typically to create "comps" for client approval, usually in Adobe Illustrator and/or Adobe Photoshop. The problem with comps, however, is that they are static. They do not show how the application will work from one screen to the next, which is very important to establish before development hours are spent. Today, comps can be much more powerful.
The Interactive Prototype
With the introduction of Adobe Flash Catalyst CS5, an interactive prototype can be created from the same Illustrator or Photoshop files that made the original comps. This allows the stakeholders to fully experience the design and can also be used in user group testing. Finding out what works and what doesn't early in the process will save time. Furthermore, once the prototype is approved, the same file can be used in development of the project.
Importing
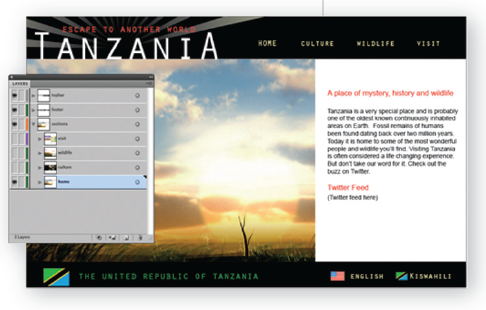
1. Starting in Illustrator CS5, create each section of the application on its own layer. Make sure all the layers are named appropriately.
2. Open the Illustrator file in Flash Catalyst CS5. Catalyst will keep the text, filters and gradients editable while keeping the design and layers intact.
3. Right-click (control-click on a Mac) and you can edit any graphic back in Illustrator (for vector graphics) or in Photoshop (for raster graphics).
 Creating Pages
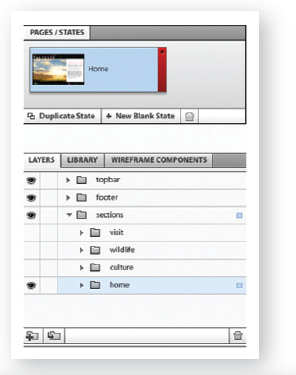
Flash Catalyst has a Pages/States panel that allows designers to define different pages of the project. By default, the first page is named "page 1." Whatever content on layers with their visibility turned on will be seen when the user is on "page 1."
1. To set up the home page, rename "page 1" to "home" and then toggle the eyeball icon to make the home folder visible.
2. Make additional pages by clicking "Duplicate State" to duplicate the home page. To continue building our Tanzania application, Rename this new State "culture" and in the layers panel turn on the visibility of the "culture" folder and hide the "home" folder.
3. Complete the same steps to create a "wildlife" and "visit" page. Make sure the corresponding layer folder is turned on for each page and the others are turned off.

Creating Buttons
In order for the user to navigate to the different pages, buttons need to be created.
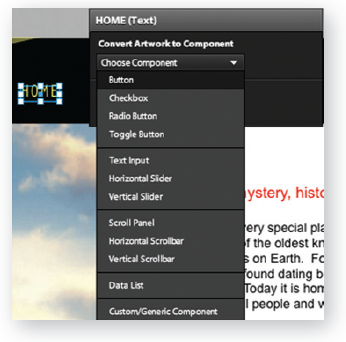
1. Select the home text in the top bar. The Flash Catalyst Heads UP Display (HUD) will appear.
2. Click "Convert Artwork to Component" and choose "Button" from the component list. This will convert the text into a button.
3. Do the same for the remaining text items in the top bar.
Adding Interactions to Buttons
Once buttons are created, interactions can be added to them. 1. Select the home button and in the Interactions panel click "Add Interaction".
2. From the Choose State dialog, select "home". Now, when the "home" button is clicked the "home" content will be shown.
3. Add interactions to the other buttons to jump to their corresponding page when they are selected.
4. Run the project by going to File > Run Project. The project will be displayed in your default Web browser. 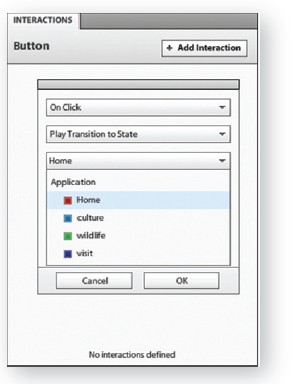
Additional features can be added to a Flash Catalyst project; such as transitions, audio, video, data lists, scrollbars and even SWF content created in programs like Flash Professional CS5.
From Interactive Prototype to Final Development
The great advantage of making an interactive prototype in Flash Catalyst is that your work isn't wasted once the interactive prototype has been approved - the same Flash Catalyst file can be opened in Adobe Flash Builder for further development. Flash Builder helps software developers rapidly develop cross-platform RIAs and content. It includes support for intelligent coding and debugging, and can easily connect to Web services or databases.
Opening a Flash Catalyst file in Flash Builder
1. In Flash Builder, open a Flash Catalyst project by going to File > Import > Import Flex Project (FXP)...
2. Once imported, expand the "src" folder and look in the default package where you will find the Main.mxml file.
Double-click it to open. 3. Click "Source" view to see the MXML code created in Flash Catalyst, such as the button functions.
4. Click on the "Design" view to see and further edit the design, and even toggle between the pages using the "States" panel.
From there you can easily use data from many different types of sources by using the Data/Services panel.
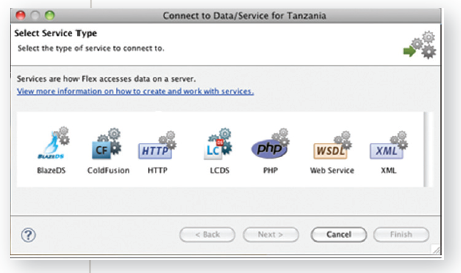
Publishing the Application
Once the application is complete it can be delivered as a Web or desktop application. The Web application will use the cross-browser Flash Player runtime, while the desktop application will use the Adobe AIR runtime.
Creating a More Rich, Immersive Experience
In some cases you might want even more control over graphics, animation, video, audio and other elements. If that's the case then Flash Professional might be in order. Not to worry. Flash Professional follows a similar workflow. Just import the PSD or AI file directly into Flash Professional. The integrity of the design will be maintained, complete with layers and editable text if so desired.
Adding Interactivity
One new feature in Flash Professional is the ability to add pre-written ActionScript by using the Code Snippets panel. 1. Select a button or movie clip to which you want to add a code snippet.
2. Give the button or movie clip an instance name using the Properties panel.
3. Double-click the Code Snippet you'd like to add. The code snippet will be added to your project.
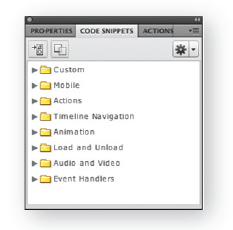
A very nice feature is that Flash Professional doesn't hide the code. In fact, it exposes the ActionScript and even includes comments on how to execute modifciations. This is a great place to not only learn ActionScript but advanced users can also save their own Code Snippets for later use.
The final Flash Professional project can be output to the Web (SWF), desktop (AIR), or mobile devices, making it a program that can truly create multi-screen projects all from the same source file. Or, the SWF can be included in the Flash Catalyst project.
The workflow between designer and developer needn't be filled with compromises or long, unproductive hours. With the right tools it can be a seamless process, enabling a project to be completed faster, and with better results. Take advantage of the tools available to you.
About the Author: Paul Trani is an Adobe Developer Evangelist and passionate 15-year veteran of the interactive design and development scene. He has years of experience as a driving force for awardwinning agencies and draws on that experience as a presenter, Adobe Certified Instructor, courseware developer, and Lynda.com trainer. Paul maintains a blog at www.designupdate. com and can be followed on twitter @paultrani.

Subscribe to Our Newsletter!
Latest in Web Design


