Claiming Your Facebook Place (Guide)

Facebook has become an important channel for marketers - on the Web and off. The social media destinations relatively new Facebook Places offering provides busineses an additional opportunity to track the people who visit their store, office or venue.
According toe Facebook, "Facebook Places allows users to share where they are, find their friends and discover interesting places nearby." When customers check into your Place, these social mentions can generation impressions in friends' News Feeds and extend your brand to new customers for free.
 Step 1: Create Your "Place"
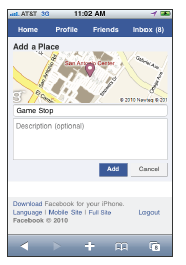
To add your business' physical location someone needs to check - in this guide, that "someone" will be you. First however, open your Facebook application (touch devices only, e.g. iPhone) and see if the location already exists - this can be done by searching for the business name. Should the place not exist, click the "add" or the "+" sign depending on the device in use, and enter the name and description (this can be edited later). Once you have created the place, you can then check in.
Step 2: Claim Your "Place"
The next step is to actually claim your place which will allow you to manage your address, contact information, business hors, profile pictures, administrators, etc. Facebook Places is very similar to managing a Facebook Page, but with additional functionality like Maps, directions, and of course check-ins. To claim the business as your place, you must:
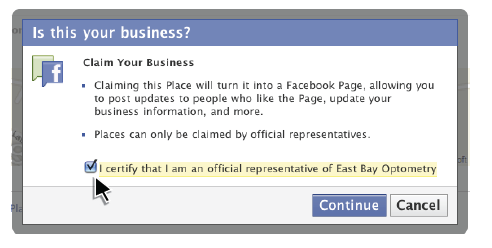
 - Log in to Facebook.com, search for and select the name of the place, and finally clicking on the "Is this your Business link to claim your Place.
- A popup box will then appear after selecting that link. Check the box to certify that you are an official representative of the business.
- Facebook then needs to verify your Place by calling the phone number listed. When you're ready, select the "Call me now" option.
- When the phone rings, pick it up and enter within the field provided on Facebook.com the four digit pin number provided by the automated operator.
If Facebook does not have a phone number listed for you, or the phone they attempt to call is incorrect, select the "Is this the wrong number?" link and you will be directed to a document verification process. You will then be notified by email when your Place has been claimed successfully.
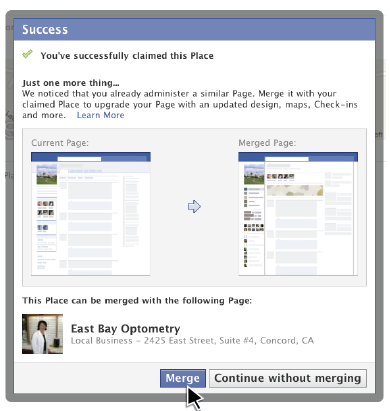
Is that all there is? Nope, now you get to merge your Facebook Place with your existing Facebook page.
Step 3: Merging Places and Pages (Optional)
The final step in getting started with Facebook Places is to merge your newly claimed Place with your Facebook page. Keep in mind that this step is not required but you may benefit from doing so. If you have successfully claimed your "Place" then final notification you will receive is the "merge notification". Merging enables you to upgrade your existing page with an updated design, maps, the check-ins, etc.
All in all, a relatively simple and painless process. Now site back and enjoy the benefits of participating in Facebook Places!

Subscribe to Our Newsletter!
Latest in Social Media


